Einführung
Ein Tipp undicht oder gebrochen kann ärgerlich sein. Dies kann zu unnötig hohem Wasserverbrauch führen und zu, daher, Auf lange Sicht hohe Wasserkosten und mögliche Wasserschäden. Das Ersetzen eines Hahns ist normalerweise ein unkomplizierter Prozess, der in den meisten Fällen keinen Profi für einen Hausbesitzer benötigt. In diesem Artikel, Sie werden über die Hauptgründe informiert, warum ein TAP ein Problem entwickeln kann und Schritte folgen, um den Hahn zu reparieren.
Bewertung des Problems
Wenn ein Hahn beschädigt ist, Man muss das Problem identifizieren, damit er oder sie es reparieren kann.
Anzeichen eines schlechten Hahns
– Wasser fließt mit einer langsamen Geschwindigkeit über das Rohr, wenn der Wasserhahn ausgeschaltet ist
– Wasser kommt in einer Weise aus dem Wasserhahn heraus, die nicht kontinuierlich ist.
– Losen Wasserhahngriff und kann nicht so verdreht werden, dass er den Wasserfluss richtig geöffnet oder nahe reguliert werden kann
– Wenn der Wasserhahn eingeschaltet ist, Wasser fließt nicht.

Potenzielle Ursachen
– Erhitzte Gummi -Waschmaschinen
– Die Abnutzung tritt auf den Ventilsitzen im Wasserhahn auf.
– Gebrochener/rissiger Griff
– Mineralablagerungen wie Limescale oder einen blockierten Belüftungsbelüftung
– Gebrochener/beschädigter Tap -Kopf
Dies liegt daran, dass wenn Sie die Symptome im Detail betrachten, Es wird einfacher sein, die Hauptwurzel des Problems zu identifizieren.
Sammeln der erforderlichen Werkzeuge
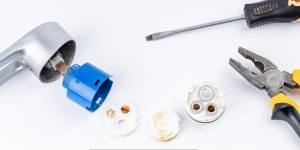
Das Beheben eines Hahns erfordert einige wichtige Werkzeuge, die die meisten Hausbesitzer bereits besitzen:
– Verstellbarer Schraubenschlüssel
– Beckenschlüssel
– Schraubendreher
– Klempnerkutt
– Ersatzwaschmaschinen
Möglicherweise benötigen Sie auch ein Sitzbezugs -Werkzeug oder einen neuen Wasserhahnkopf, wenn diese Teile abgenutzt sind. Bereiten Sie alle möglichen Materialien vor, die Sie bei der Ausführung der Aufgabe verwenden werden.
Ausschalten der Wasserversorgung
Vor dem Abbau des Wassers, Schließen Sie die Absperrventile, die normalerweise unter der Spüle liegen, um das Sprühen von Wasser beim Entfernen von Schläuchen oder Rohren zu vermeiden. Dies ermöglicht es Ihnen, den Hahn zu untersuchen und zu beheben, bei Bedarf, ohne zu eilen.
Das fehlerhafte Wasserhahn zerlegen
Die spezifische Intervention wird, daher, hängen von der Art der Durchführung ab, die durchgeführt werden soll.
Aber im Allgemeinen:
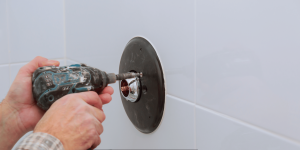
- Drehen Sie den Tippgriff mit einem Schraubendreher
- Lösen Sie die Haltermutter, indem Sie sie gegen den Uhrzeigersinn mit einem verstellbaren Schraubenschlüssel drehen
- Entfernen Sie die Patroneneinheit/-baugruppe
- Überprüfen Sie die Unterlegscheiben nach Abnutzung, Sitze, und/oder Ventile.
Die meisten Innenteile schieben direkt ein und können in den meisten Fällen herausgezogen werden, wenn Sie das äußere Gehäuse herausnehmen.
Alte Unterlegscheiben und O-Ringe ersetzen
Wenn Unterlegscheiben geknackt oder komprimiert sind, Sie gelten als abgenutzt und müssen somit ersetzt werden. Lose O-Ringe müssen möglicherweise auch ersetzt werden, wenn sie abgenutzt oder beschädigt sind. Ersatzwaschmaschinen und O-Ringe sind billig und können problemlos in örtlichen Geschäften gekauft werden.
– Installation neuer Unterlegscheiben und O-Ringe von geeigneten Größen
– Stellen Sie sicher, dass sie gut positioniert sind, bevor sie sie zusammenbauen
Andere interne Komponenten beheben
Andere Teile, die möglicherweise ersetzt oder repariert werden müssen, die Ventilsitze, Patronen, oder der Belüter, wenn sie beschädigt sind. Um die Komponenten wieder in eine voll funktionsfähige Tap -Fixierung zu rekonstruieren, Befolgen Sie einfach die obigen Schritte in umgekehrter Reihenfolge, wenn Reparatur oder Ersatz erforderlich ist.
Neuinstallation des Wasserhahns erneut installieren
Beim erneuten Installieren des Wassers:
– Stellen Sie sicher, dass alle Teile fest ineinander ineinander schalten
– Um keine Lecks zu gewährleisten, Tragen Sie einen Klempnerkitt auf der Basis des Hahns an, an dem der Hahn mit der Spüle verbunden ist.
– Schalten Sie das Wasser allmählich wieder ein und suchen Sie nach einem Tropfen, um die Leckage zu bestätigen.
– Nach Bedarf, Korrekturen vornehmen, die das Tropfen beenden.
Der Tap -Griff sollte jetzt sehr reibungslos sein, um zu arbeiten. Geben Sie ihm eine endgültige Verringerung mit Schraubenschlüssel, um alles zu sichern.

Fehlerbehebung Probleme
Wenn das Wasser nach dem Zusammenbau ungleich, Es könnte immer noch sein, dass es immer noch einige interne Teile gibt, die falsch ausgerichtet sind oder der Montageprozess nicht richtig durchgeführt wurde.
Gehen Sie diese Tipps zur Fehlerbehebung durch:
– Suchen Sie nach Anzeichen von Rissen oder irgendeiner Form von Schäden, die die neuen Ersatzteile aufweisen können
– Überprüfen Sie die richtige Größe und Positionen aller O-Ringe
– Vielleicht ändern Ventilsitze oder Patroneneinheit
– Stellen Sie sicher, dass alle Rohre/Schläuche ordnungsgemäß in die Armaturen eingeschraubt sind
Daher, Es ist möglich, verbleibende Probleme mit einigen Änderungen und Überprüfungen zu löschen, um sicherzustellen, dass alles korrekt ist.
Wann soll ich einen Profi anrufen
Während Do-it-yourself-Tap-Reparaturen für kleinere Korrekturen unkompliziert sind, Möglicherweise müssen Sie einen Klempner anrufen, wenn:
– Alle Tap -Leuchten müssen ersetzt werden, da sie entweder sehr alt oder schlecht beschädigt sind.
– Dies sind diejenigen, die aus den an der Wand installierten Versorgungsleitungen oder Rohren stammen.
– Die Ursache wird auf niedrigen Wasserdruck oder Aufbau von Mineralien zurückgeführt.
Ein professioneller Klempner verfügt möglicherweise über fortschrittliche Kenntnisse und Tools.
Abschluss
Es ist immer hilfreich zu wissen, wie man in Ihrem Haus eine Reparatur durchführt, Vor allem, wenn es darum geht, Probleme wie das Beheben eines kaputten Wasserhahns zu beheben. In vielen Fällen, Es kann möglicherweise nur die Änderung einiger Waschmaschinen oder Gummi-O-Ringe erfordern. Jedoch, Ein bestimmtes Problem beheben zu können, Sie sollten es zuerst identifizieren, und dies erfordert eine korrekte Diagnose. Größtenteils, Wenn Sie über die richtige Ausrüstung und ein wenig mechanisches Wissen verfügen, Sie können Ihren Hahn oft reparieren und brandneu arbeiten lassen. Es ist ratsam, professionelle Hilfe zu suchen, wenn die Probleme kompliziert zu sein scheinen oder wenn Zweifel daran bestehen, wie der Job korrekt erledigt werden könnte.
